How to photograph the moon
- Paul Farris

- Nov 5, 2025
- 3 min read
How to Photograph the Moon – Step-by-Step Guide for DSLR or Mirrorless Cameras
Have you ever looked up at the moon and thought, “I wish I could capture that!” Well the good news is you can! All you need is a Mirrorless, DSLR or similar digital camera, a zoom lens, and a little know-how. So here’s our simple, step-by-step guide to photographing the moon, PLUS we have links below if you would rather watch our tutorials on YouTube, Instagram or TikTok.

1. Gear
Whilst you don't need overly fancy or expensive gear to capture the moon, there are some essentials that you will need.
Camera : A DSLR, mirrorless (or bridge) camera that has manual functions.
Lens : A telephoto lens is a must, 200mm is the minimum, but the longer the better (remember the moon is 384,400 miles away!).
Tripod : If your camera / lens has image stabilisation then you migh get away without one, but we do recommend using a tripod for sharper images, particularly if you are using a very long focal length (zoom) lens.
3. Choose the Right Shooting Location
Light polution can be a problem, so if possible, choose a location that is away from artificial light and arrive ahead of time to set up. If you want to include foreground elements in your image, scout your location in daylight first so you know where to set up safely.
4. Camera Settings
Start with these settings and adjust as needed:
Camera mode: Select the manual (M) on your cameras mode dial.
Aperture: Select f/8 to f/11 (this will help with sharpness)
ISO: Set to around 100 or 200 (This will help minimise digital noise low.
Shutter speed: Around 1/125 sec is a good place to start
Focus: Auto Focus should work just fine, just ensure the cameras focus point is on the moon and not the dark sky. If your camera struggles to focus then use manual focus, you can zoom in using the live view feature to help you.
💡 Photo Genius tip: The moon is surprisingly bright. If your photo looks blown out (too bright), try using a faster shutter speed like 1/250 or higher, and of course if the moon is too dark try a slower shutter speed (Small tweaks can make a big difference).
5. Take the Shot
Consider using a remote (if you have one) or the cameras self timer, this will help to reduce camera shake when you press the shutter button. 💡 Photo Genius tip: Don't forget to review and zoom in on your image to make sure it is sharp, if it isn't then have another go.
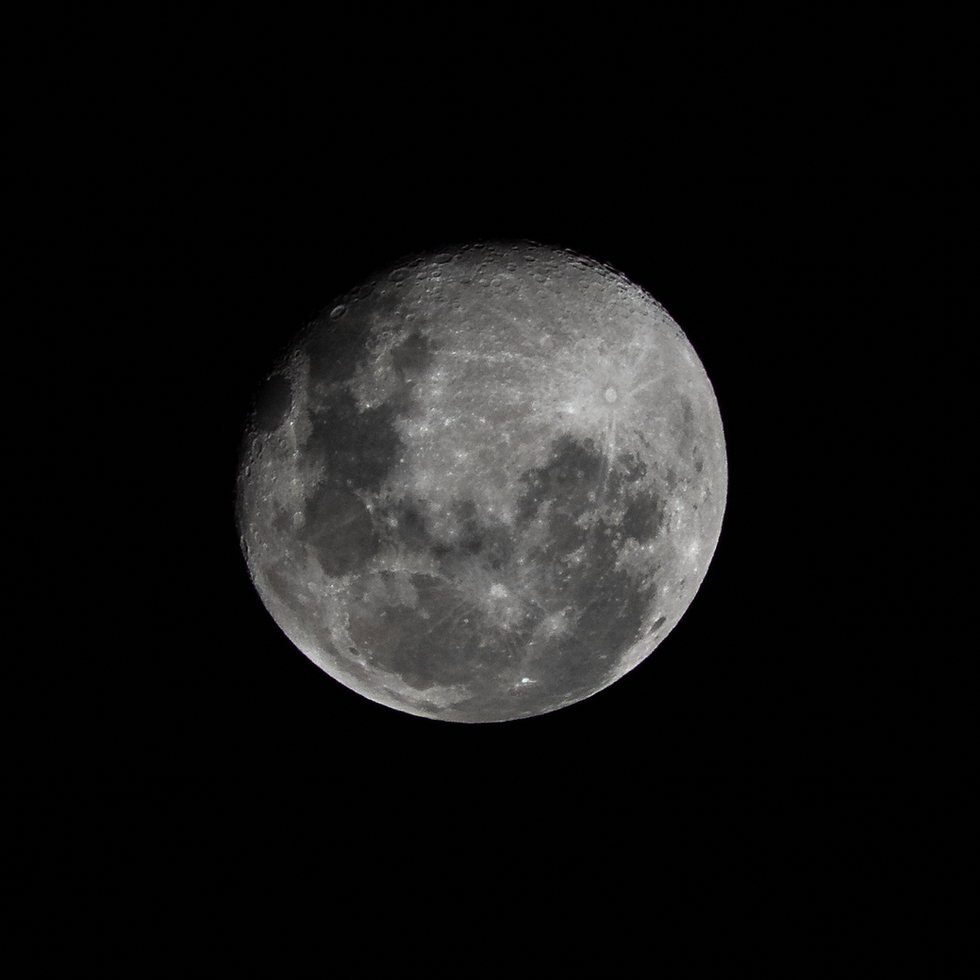
💡 Photo Genius tip: Whilst it's fun to capture a full moon (or supermoon), also try capturing a partial moon as the side light will create shadows and this can reveal details that you don't notice with a full moon (flat light).
8. Editing
A bit of light editing can make your moon photos really pop, plus cropping will make the moon appear larger in your frame - great if you lens is only around 200mm. Using software like Lightroom or Snapseed, try the following...
Increase contrast and clarity to bring out detail such as the craters on the moon surface.
Adjust white balance if the moon looks too yellow or blue. You can try Lightroom for FREE > click here for a trial version.
Final Thoughts
Photographing the moon is both fun and rewarding, and once you nail it, you’ll want to try it again and again, So keep your eyes to the sky, grab your camera and give it a try.
WATCH OUR TUTORIALS
We've created a full length tutorial on YouTube that goes into more detail, or watch our short guides on either Instagram or TikTok - Links below.